Showing posts with label Filipino Food. Show all posts

Fresh Lumpia (Vegetable Roll)

08 April 2009 9 comments

Fresh Lumpia This fresh Lumpia is one of my favorite vegetable roll, the other one being Lumpia Ubod (Heart of Palm). This lumpia is mostly vegetable with a little bit of pork and/or shrimps. You can put almost any vegetable you prefer in it, you're the cook, why not? I'm sure there are many variations of this dish just like any other Philippine dish. Mine came from my mom, of course. For the wrapper, I use a regular crepe batter and make it with my crepe maker. If you don't have a crepe maker, you can use a non-stick pan to make it. In the Philippines, some people use the regular Lumpia wrapper sold in the wet market.

FRESH LUMPIA

Filling:

1/2 cup pork, cut into small cubes
1/2 cup shrimps, chopped
1 tbsp cooking oil
salt and pepper to taste (or fish sauce instead of salt)
1/4 cup chicken broth
*all these vegetables are cut into thin and short strips
2 cloves garlic
1 small onion
1 cup string beans or snow pea
1 cup potatoes
1 cup carrots
1 cup singkamas (jicama)
1 cup cabbage


Heat oil and pre-cook the sliced potatoes, set aside. Saute garlic and onions until limp. Add pork and saute until cooked. Add shrimps and season with salt and pepper or fish sauce. Add 1/4 cup chicken broth and the rest of the vegetables except the cooked potatoes. Saute until the vegetables are done but not over-cooked. Drain and let cool down.


Fresh_Lumpia_veggies Fresh_Lumpia_wrapper


Wrapper:
3 large eggs
1 cup cornstarch
2 tbsp. cooking oil
1 1/2 cup water
1 tsp sugar

Whisk the eggs, sugar and water. Add the cornstarch and whisk until well blended. Heat the non-stick pan and brush with a small amount of oil. Depending on the size of the crepe you want to make, pour the right amount on the heated pan. Tip the pan to spread the batter thinly. When the edges begin to separate from the pan, the crepe is done. Repeat until all the batter is used.


Sauce:
3 cups water
3 tbsp soy sauce
1 cup brown sugar
1 1/2 tsp salt
3 tbsp cornstarch diluted in 1 tbsp water
ground peanuts, chopped (optional)
3 cloves garlic, minced (optional)

Mix all ingredients except the diluted cornstarch. Cook until it boils, lower heat. Add the cornstarch mixture and mix. Cook until thickened. Add peanuts and garlic in the sauce or if you prefer, sprinkle these on top of the wrapped lumpia and sauce when ready to serve.

Fresh_Lumpia1


To serve:
Use one crepe and place a piece of lettuce on one side. Add the right amount of filling on top of the lettuce. Fold the bottom part over and then fold the sides of the crepe. Secure with a toothpick.

Read full post >>

Sans Rival - Oh My Goodness!

02 March 2009 13 comments

Sans Rival SANS RIVAL

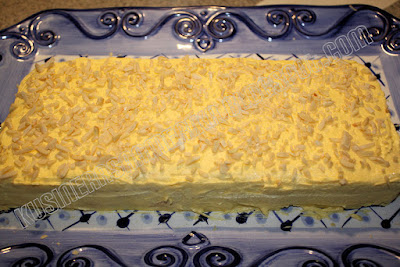
What do you get when you mix meringue, buttercream and almonds? Sans Rival, what else? The photo and title says it all, what more can I add to it? Delicious, rich, mouth-watering, diet buster, calorie laden dessert. Ah, one shouldn't think of diets when enjoying this dessert. This is one of those rare times that eating it is worth sacrificing 1 day off your healthy lifestyle. That's why you don't eat Sans Rival every week, you're only allowed to have this dessert uhm once every year? Ok, maybe once every six months.


The name Sans Rival is French, meaning 'without rival'. Nobody knows where this dessert originated but it sure has some European characteristics. It's like Napoleons. It's an Almond torte and consists of layered crispy meringue with almonds and buttercream. There is also another dessert that is similar to this called Sylvannas, the only difference being the Sylvannas is shaped like a huge egg but it tastes the same.

I grew up eating Sans Rival from Goldilocks. This is one of my favorite desserts from that popular Filipino bakery along with Mocha and Ube rolls. When I moved to Northern California 20 years ago, I was ecstatic when I learned that Goldilocks is just a drive away. I got a sticker shock though, a small square of Sansrival costs $25 (back then). No wonder it's expensive, it's a little complicated to make this. There aren't a lot of ingredients but it takes a lot of work to assemble the whole thing. After many years of wanting to try to make this dessert, I finally did it two weeks ago. I was thinking of what dish to bring to a party when I decided to make dessert. It turned out quite good, very good, in fact. Would I make it again? Hmm, yes I will (if somebody pays me to do it LOL). I used almonds instead of cashew nuts just because. If you are a novice baker, then I would suggest you buy it instead of trying to make it. :o) For an expert baker, this is quite easy to make. All you need is a lot of patience and Reynolds Release non-stick aluminum foil. If you don't have this special aluminum foil, use baking paper or parchment paper.


SANS RIVAL
for the wafers:
10 egg whites at room temperature
1/4 tsp cream of tartar
1 cup sugar
2 cups finely chopped almonds
for the filling and frosting:
6 egg yolks
1/2 cup light corn syrup
2 tbsp water
1/4 cup sugar
2 sticks butter at room temperature (1/2 lb)
for the topping:
1/2 cup finely chopped almonds
- Beat egg yolks until it turns light yellow.
- Heat corn syrup, sugar and water over low heat. Cook for 2 minutes after it boils.
- Pour the syrup into the egg yolk slowly while beating on medium speed. Set aside to cool down.Cream softened butter and gradually beat in cooled yolk mixture.Set aside.
- Preheat oven to 325F. Line three cookie sheets or jelly roll pan with parchment paper. Generously grease and flour the parchment paper (very important so the meringue will not stick; if you use the Reynolds Release foil, then you don't have to grease and flour)
- Beat egg whites and of tartar until soft peaks form. Add sugar a tablespoon at a time, beating well after each addition. Beat until stiff.
- Fold in ground almonds.
- Spread evenly on the cookie sheets about 1/4 inch thick. Bake for about 30 minutes or until golden brown.
- Cut the wafer into desired size while still warm. Peel off the paper or foil. If the parchment paper is sticking, cover with damp towel for a minute or so.
- Spread the frosting thinly on top of each meringue and stack another meringue, repeat with the layering . Don't put too much frosting in each layer or you wouldn't have enough to frost the outside of the Sans Rival.
- Sprinkle chopped almonds on the top and sides. Chill in the fridge for a couple of hours.


SUBSCRIBE BY EMAIL HERE

Read full post >>

Lumpia Shanghai, Filipino Spring Roll, Filipino Egg Roll

26 January 2009 6 comments

Lumpia Shanghai Lumpia Shanghai is one of the most popular Filipino dish here in the U.S. If you ask an American who has a Filipino friend, co-worker or family member, what their favorite Filipino food is, most likely they'll tell you it's Lumpia. My husband's family like it so much that they always ask me to cook some everytime we get together for special occasions.

This is an easy recipe, it's similar to making meatballs. The only difference is that making it is very tedious since you need to roll each and every one. If you don't eat pork, you can substitute ground turkey, chicken or beef. Some recipe calls for water chestnuts but I find that unless you intend to cook these right away, it is best to omit this ingredient. The water chestnut adds moisture to the lumpia which will make the wrapper soggy if you plan to freeze it. I use the food processor to mince the onions and carrots just to save time.

The spring roll wrappers can be found in any good Asian grocery. I use these wrappers instead of the 'egg roll' wrappers because it is thinner. Each bag has 25 wrappers. I cut the lumpia in half before frying so I get 50 small lumpias in all. I added the step-by-step photos on how to roll the lumpia if you do not know how to go about it. I either use beaten egg or a mixture of flour and water boiled into a paste to seal the lumpia. I hope it helps. :o)

Here is the recipe:

LUMPIA SHANGHAI

1 LB. ground pork
1 medium carrot, minced
1 small onion, minced
3 cloves garlic, minced (optional)
3 stalks green onion, chopped
1 egg, beaten
salt and pepper to taste

Mix all ingredients in a bowl. I fry a small pattie of the mixture just to test if it needs more salt or pepper. Peel off one spring roll wrapper and cover the rest with a towel to prevent it from drying out. Put one tablespoon or less of the mixture in the middle of the wrapper as shown in the photo. Shape it with your spoon so that it resembles a thin cigar. Brush some beaten eggs on both corners and fold across. Always brush the corner to be folded with the beaten eggs and fold as shown in the photo. Try to fold it as tight as possible. Don't forget to seal the edges (photo #4) with beaten eggs. Fry in medium high heat until golden brown.

You can freeze the lumpia up to 2 months. You don't need to thaw it before cooking. I just cut the lumpia in half and fry it.

Serve with sweet and sour sauce or duck sauce.


SUBSCRIBE BY EMAIL HERE

Read full post >>

Itlog Maalat (Salted Eggs)

04 October 2008 13 comments

This is one of those foods that is an acquired taste. As you can tell from its' name, this egg is very salty. I don't even dare to find out how much sodium per serving it contains. That is why I get to enjoy this rarely. Duck eggs are ideal to use when you want to make salted eggs. For me it has a different taste and has more flavor. Uncooked duck eggs are usually available in some Asian supermarkets. You can purchase these already cooked and sold in packs of six. There are also uncooked salted eggs available, boil them as you would boil a regular egg. The ones I've seen is imported from China or Taiwan. The taste is the same as the ones in the Philippines. My relatives always brings me back a tray of salted eggs from Pateros, the city where these salted eggs became well-known for.


If you want to make your own but do not have access to duck eggs, you can use chicken eggs. It is very easy to make. There are two different procedures, one that makes use of mud and one without. I prefer not using mud since I do not want to deal with the mess. If you want the authentic salted eggs with the oily yolk, then you need to prepare it using the method with the mud.
Salted Eggs
10 eggs
1 1/2 cup
salt
6 cups
water

Wash the eggs.
In a large pot, dissolve salt in water.Add the eggs. Put a plate on top of the eggs and put a ziploc bag with enough rice kernels to ensure the eggs remain submerged once the lid is closed.
Leave in room temperature for 30 days.
After 30 days, boil the eggs.
Refrigerate.
These salted eggs with tomatoes and onions are good for use as a side dish when serving fried fish and even dried fish.
Note: The red color is just food coloring. The vendors in the Philippines have different kinds of eggs for sale and the color helps them distinguish the salted eggs from the rest.

SUBSCRIBE BY EMAIL HERE

Read full post >>

Buko Pandan - My Favorite Dessert

24 September 2008 9 comments


I remember tasting this unusual dessert when I went back to the Philippines in 2003. This dessert has young coconut slivers mixed in with Pandan (Screwpine) flavored gelatin, sugar and heavy cream. The cream was heavily colored with Pandan extract so it was greener than the one I made on the photo above. Regardless of the aesthetic, I still liked the taste. It's simple and not pretentious.
Making this is quite easy. The part that took the longest was waiting for the gelatin to set. Otherwise, everything was a breeze. I decided to work on the presentation a little bit. You can blame it on the years I watched Food TV (now the Food Network.)

You can find Pandan (Screwpine) leaves in an Asian grocery, it is usually in the frozen food section. Some grocery have the Pandan extract, using this will save you time. Young coconut is sold in cans or you can also find these in the freezer section.

BUKO PANDAN
2 cans young coconut meat, drained and cut into strings
1/2 teaspoon pandan extract
2 cups heavy cream
3/4 cup sugar or Splenda
for the Pandan gelatin:
2 (90 g) packages unflavored gelatin
3 cups water
1-1 1/2 tablespoon pandan extract
4 drops green food coloring (omit if extract is green)
1/4 cup sugar

Dissolve gelatin and sugar in the water and bring to boil.
Remove from heat and stir in the pandan extract and food color.
Pour into a rectangular pan and refrigerate until firm.
Cut the gelatin into 1 inch cubes.
Whip the heavy cream to thicken it just a little bit but you can use it as it is.

In a large bowl, mix cream, sugar and pandan extract.
Add the gelatin cubes.
Chill before serving.

Notes:
-You can substitue light cream or half and half for the heavy cream. If you want an authentic Filipino flavor, use the brand NESTLE CREAM (canned cream.)
-If using Pandan leaves, boil it in 3 cups of water. Use this liquid for the gelatin.
-Adjust the amount of sugar according to your taste.

SUBSCRIBE BY EMAIL HERE

Read full post >>

Filipino Pork Barbeque

17 August 2008 16 comments

Having pork barbeque signifies the start of the warm weather for me. I live in the part of of the country where there are four seasons and grilling in the middle of winter is not an option (although I tried it once, crazy me!) There are hundreds of recipe variation of pork barbeque. One can basically make their own recipe and call it the same name. This is similar to Teriyaki or Korean barbeque but what sets Filipino pork barbeque from the rest I think is the sweetness from the banana ketchup (you read that right, a ketchup made from bananas.) A typical Filipino pork barbeque has some fat on it. Since dh does not like fat, I make a couple of pieces for him that is all lean meat. It's also important to grill this on medium heat so it will not end up all burnt and crisp. If using a tough part of the pork, you can add some type of lemon soda to the marinade to act as a tenderizer. I prefer to marinate the meat for half a day or a minimum of two hours.

FILIPINO PORK BARBEQUE

2 lbs. pork shoulder, sliced into strips (approx. 1-in wide and 1/2-in thick)
6 cloves garlic, crushed
2 cups light soy sauce
1/4 cup brown sugar
1/2 tsp pepper flakes (can be adjusted to your taste)
juice of 1 lemon
2 tsp Worcestershire sauce
1/2 cup banana ketchup (regular ketchup can be used)
barbeque stick

Marinate the pork in the mixture for a couple of hours. Soak the barbeque stick in water for 5 minutes, this will prevent it from burning. Drain the pork and set aside the marinade. Put the meat in the stick, 2-3 strips per stick.
Cook it in the grill over medium heat, using the marinade as a basting sauce. At the last 5 minutes of cooking, do not baste the pork, just let it finish cooking. Do not overcook, the meat will be tough.

Note:
- this marinade can also be used for chicken
- Banana Ketchup can be purchased in any Asian store that carries Philippine products. (Brands: UFC or Jufran)

SUBSCRIBE TO RECEIVE MORE RECIPES BY EMAIL. YOU WILL ONLY GET EMAILS WHEN THERE IS A NEW RECIPE POSTED. NO SPAM OR ADVERTS. SUBSCRIBE BY EMAIL HERE

Read full post >>

Wokna What? It's Woknatoy!

29 May 2008 7 comments

Woknatoy

This is a dish I learned from my mom and as you can see, it has a funny if not weird name. 'Woknatoy', what does it mean? Beats me, I don't know either. This dish was a concoction of a cousin who is in the catering business. It has a tomato-based sauce just like the Menudo or Afritada. The main difference is the addition of sweet pickles and it's juices.
WOKNATOY

1 whole chicken, cut up into pieces
3 cloves garlic, chopped
1 small onion, quartered
1 small can Tomato sauce
1 cup water
1 medium carrot, cut into bite sized pieces
1/2 Red Bell Pepper
1/2 Green Bell Pepper
4 potatoes, quartered
6 pieces Sweet pickle, quartered
1/8 cup pickle juice
Fish Sauce or Salt
Pepper

Saute garlic and onions in oil until limp. Add chicken and some salt, saute until juices comes out. Add the tomato sauce and water. Bring to boil and let simmer for 15 minutes. Add the potatoes and carrots, cook until fork tender. Add the rest of the ingredients. Let simmer for another 5 minutes. Season with fish sauce or salt and pepper.

SUBSCRIBE BY EMAIL HERE

Read full post >>

Bagoong - An Acquired Taste

18 May 2008 13 comments

Mango with Bagoong

What is the perfect pair for bagoong? Green mangoes of course! Too bad for me, I cannot find any here in my local grocery. The mango in the photo is the closest I can get to a green mango. I chose the mango that has a lot of green color left on the skin, hoping that it is still green inside. As you can see, it's already turned yellow but it is not entirely sweet. I can still taste the tanginess and sourness of an unriped mango, hurrah! :) But this post is about Bagoong. There are many kinds of Bagoong and the one I like is made with tiny shrimps. I never did take a liking to the one made with fermented fish which looks and tastes completely different, my mom by the way, prefer this kind. I think it is more commonly used in the Visayas and Mindanao region.

My husband who eats almost everything tried Bagoong but he didn't like it, he said it is too salty for him even with Kare-kare. My brother-in-law on the other hand, likes Bagoong, go figure. The Bagoong I like to use comes from Pampanga, I find it just right for my taste, not too salty. My perfect Bagoong has a lot of garlic, onions and tomatoes. My mom cooks it with tiny pieces of pork but I prefer it plain. There is a dish I like called Binagoongan, it is made with cubed pork (preferably with fat), garlic, onions, vinegar and Bagoong. People also use Bagoong with Kare-kare (Ox tail in peanut stew) as a condiment and in Pinakbet (a mixture of vegetables and Bagoong). If you do know of any other uses of Bagoong, do let me know.


Bagoong

1 bottle uncooked Bagoong
6 cloves minced garlic
1/2 medium onion, minced
2 tomatoes, chopped
3 tbsp vinegar (can be modified depending on your taste)

Saute garlic and onions in oil until onions are translucent. Add the tomatoes and cooked until soft. Add the Bagoong and mix, bring to boil. Add the vinegar but do not mix (very important!). Cook in medium heat for 10 minutes without mixing. After 10 minutes, mix and taste. Add a tablespoon of vinegar if you feel it needs more acidity (cook another 10 minutes if you added more vinegar).

SUBSCRIBE BY EMAIL HERE

Read full post >>

Pancit Palabok or Pancit Luglug - PART 2

14 May 2008 14 comments

Pancit Palabok


This is my shortcut version. I used to make my Palabok sauce from scratch but one time I bought a Palabok sauce mix and tried it but found it too salty for my taste. Thus my shortcut Palabok recipe was made.


Pancit Palabok Sauce recipe #2

*Saute garlic, onions and ground chicken (or minced chicken). When chicken is cooked, add chopped shrimps and saute until pink.


*Use one packet of Pancit Palabok mix (I use Mama Sita or White King brand).

*Follow the directions at the back of the packet. (It says to add water to the mix).

*Add the uncooked sauce to the sauteed chicken and shrimp. Bring to boil and simmer until thick.

*Add 1 can of Cream of Mushroom soup and enough chicken broth or water to
make a nice sauce. Make sure you don't add too much broth or your sauce will be too watery.


*Mix very well until the Cream of Mushroom is incorporated with the Palabok sauce.

*Bring back to boil. Simmer for another 10 minutes stirring frequently (important if you are not using a non-stick pot).

*Season to taste (I found that the Palabok mix tend to be salty so I don't have to add any more seasonings).


*Serve over cooked pancit bihon. Add ground chicharon, tinapa flakes, eggs, green onions and lemon.

Voila, an instant Pancit Palabok sauce that's fast and easy.


PANCIT PALABOK RECIPE #3 (from scratch)

Palabok:
2 cups Shrimp juice (crush shrimp heads in 2 cups water and strain)
1/4 cup atchuete water (2 tbsp atchuete seeds soaked in 1/4 cup water)
6 tbsp flour dissolved in 1/2 cup water
Fish sauce, to taste
Ground Pepper, a pinch

Add shrimp juice and atchuete water in a sauce pan and mix. Add the flour/water mixture and stir constantly. Bring to boil. Season with fish sauce and pepper. Set aside.

Red Sauce:
3 tbsp cooking oil
4 cloves garlic, minced
1 cup cooked pork, cubed
2 pcs tofu, cubed
1/4 cup atchuete water (22 tbsp atchuete seeds soaked in 1/4c water)
1 cup shrimp juice
1/4 cup flat-leaf parsley (Kinchay)
Fish sauce and ground pepper , to taste

Brown garlic in oil, set aside for garnish. Brown pork in hot oil, add tofu and fry for another minute. Add the atchuete water. Pour the shrimp juice and bring to boil. Add the parsley and season with fish sauce and pepper. Set aside.

Garnish:
1/2 cup Tinapa (smoked fish), flaked
1/2 cup Chicharon, ground
2 hard-boiled eggs, chopped
1/2 cup boiled shrimps
1/4 cup green onions
1 lemon, sliced

Boiled Bihon noodles.

Put noodles in a large platter. Cover with Palabok sauce. Top with the pork and tofu mixture (Red sauce). Sprinkle with Tinapa, Chicharon, eggs, shrimp, green onions and fried garlic. Serve with lemon slices and fish sauce.

Source: Let's Cook With Nora by Nora Daza

Click here for another short version of Pancit Palabok recipe.

If you like my recipe, please leave a comment to let me know and subscribe by email for more delicious recipes. Thank you! :)

SUBSCRIBE BY EMAIL HERE

Read full post >>

Mangoes are Here!

08 May 2008 8 comments

Mangoes! This is what I've been having for breakfast. You should have seen my eyes light up when I walked in at KamMan Asian grocery and saw boxes of mangoes right by the entrance. This is the closest that I can get to mangoes that tastes like the ones back in the Philippines. It's close but it's not the real thing of course, nothing beats the taste of Philippine mangoes. These mangoes are grown in Mexico and they call it 'Champagne' mangoes. One box has 20 pieces and I paid $14.00 They probably got the seeds from our mangoes since it's very similar. I will post a mango dessert later. I tried it when we spent New Year's Eve at Dakak Beach Resort in the Philippines years ago.

Do you have a favorite dessert featuring mangoes?

Read full post >>

Beef Caldereta

05 May 2008 10 comments

Caldereta As with most Filipino food, Caldereta originated in Spain. They have the same dish and almost all the ingredients are similar with the exception of Cinnamon stick, which is called for in the Spanish recipe. This dish can be made with beef, goat meat or even chicken. I prefer using beef for my version of Caldereta. Some recipes call for the use of vinegar as a marinade, along with salt, garlic and pepper. This is advisable if you are using a tough part of the beef as vinegar acts as a meat tenderizer.

Browning the beef as the first step of the cooking is very important. Do not use a non-stick pot or pan for this since you want the brown bits that stick to the bottom of the pan. These will add a lot of flavor to your Caldereta (or any kind of beef stew). Instead of tomato sauce, I prefer to use tomato paste (about 2-3 tbsp depending on how much water you add and how much sauce you want at the end) since I find that the resulting sauce has more depth and flavor. It is also important to let it simmer for a long time since this will allow all the flavors to meld and make the sauce thicker (you don't want a sauce that is watery).


The nice thing about Caldereta is you can omit some or most of the ingredients. As long as you have beef and tomato sauce, you'll still end up with a good dish. It's okay if you don't have liver sauce or olives or green peas. I for one do not add green peas, just because dh does not like it. If you like a Caldereta with a kick, add some chili pepper flakes or chili peppers.

This recipe is a combination of recipes from my mom, aunts and cook books. You can tweak this recipe to accomodate your taste


BEEF CALDERETA
Coooking Caldereta
2 lbs beef cubes
1/4 cup soy sauce
1 tbsp garlic, crushed
1/2 tsp ground pepper
1/4 cup cooking oil
1 medium sized onion, chopped
1 can tomato sauce
1 3/4 cups water
2 tsp Worcestershire sauce
additional 2 1/2 cups water Caldereta
3 medium-sized potatoes, quartered

1 large carrot, chopped
1 red Bell pepper, chopped
1 tsp salt
1/4 cup canned liver spread
1/2 cup green peas
1/2 cup whole olives (optional)
Chili pepper flakes (optional)


- Marinate the beef in soy sauce, garlic and pepper for at least 1 hour. Drain and reserve the marinade.
- Heat the oil in a large pot.
- Fry the beef cubes until brown in all sides. Set aside.
- Add the onion and saute until limp. Caldereta
- Pour in the tomato sauce, water, Worcestershire sauce and reserved marinade.
- Bring to boil and then lower the heat to simmer until the beef cubes are tender (approximately 1 1/2 hours). Add more water if needed. You should end up with an oily and thick sauce just like what is shown in the photo at the right. Skim the fat off the sauce.
- Add potatoes and carrot, cook for 10 minutes.
- Add Bell pepper and cook for another 5 minutes.
- Add the rest of the ingredients. Add salt if needed.
-Serve over rice.

Subscribe to receive more recipes by email. You will only get emails when there is a new recipe posted. No SPAM or adverts. SUBSCRIBE BY EMAIL HERE

Read full post >>

What's My Steak? Bistek

28 April 2008 15 comments

Filipino Beef Steak

You would think that having been living here in the US for 19 years, I would swear off eating Philippine beef steak. Uh-uh, I still crave for Bistek as I call it from my younger days. I like the salty sauce on top of piping hot rice and the crunchiness of the onions with the beef. They say that this is the poor man's steak, I don't know about that since beef round and tenderloin are so expensive.

The type of soy sauce that you use is crucial to this dish. Use soy sauce that is not too salty. I find that Silver Swan brand is too salty for me so I use Marca Pina. I have not tried using Kikoman Lite Soy Sauce for this but I would guess that it will turn out fine since it's not too salty like the original. Using Vidalia onions is also recommended since the sweetness of these type of onions complement the saltiness of the sauce. If you are using a part of the beef other than the round, I suggest you pound the beef slice with a mallet or something similar to tenderize it. I remember my mom using the back of the knife to pound the beef, so it's not cutting through the meat. As with any cooking recipe, this can be tweaked according to your taste.

PHILIPPINE BEEF STEAK "BISTEK"

1 lb. Beef round or tenderloin, sliced thin
1/2 cup soy sauce
Juice of 1 lemon
ground pepper
1 big onion, sliced across so you'll end up with rings

1. Mix soy sauce, ground pepper and lemon juice in a big bowl.
2. Add the sliced beef and mix with your hands. Let sit in the fridge for 30 min.
3. Heat oil in a big pot.
4. Fry the onions up to the consistency you prefer. I prefer my onions to be soft, some like it crunchy. Set aside.
5. Fry the beef but do not over cook. Remember that the beef slices are thin so it does not take long for it to cook. Over cooking the beef will result in tough and dry meat. Set aside the cooked meat while you're cooking the rest of the meat.
6. Pour the sauce in the pot and cook for 2 minutes.
7. Arrange the beef slices in a serving bowl and put the cooked onions on top. Pour the cooked sauce over the meat and onions.
8. Serve over hot rice.

SUBSCRIBE BY EMAIL HERE

Read full post >>

Use Your Noodle, Make Pancit Canton

21 April 2008 6 comments

Pancit Canton

Are you a noodle lover like me? I love to eat most noodles and one of my favorites of course is the Filipino Pancit. As with most Asian cuisines, there are different types of noodles in Filipino cuisine. One of them is Pancit Canton. It is not original Filipino 'per se' since it came from the Chinese but with the mixture of cultures these days, one does not care as long as it tastes good.

The perfect Pancit Canton for me has noodles that are 'Al- Dente' and has a lot of sahog (ingredients). I remember having pansit that barely has any sahog, it's all noodles and maybe twenty pieces of cabbage. LOL The cook does not eat veggies so she did not care to add more. Anyway, when I cook any kind of Pancit, I add whatever vegetables I have on hand which is usually Spinach, Carrots, Celery and Onions. If I have Bokchoy or Cabbage, I add that too. Shrimps are a must and either Chicken or Pork. Dh prefers Chinese roast Pork so I add that. I like Chinese Sausage but don't use it because dh does not like the taste. Basically, you can add anything you want. :)


For the noodles, I prefer to use fresh ones. The difference is amazing, when you bite on it, it feels 'springy' or 'elastic. But of course, we do not always have fresh noodles on hand. That's where the dried noodles come in handy. Pancit Canton noodles are the yellow kind, you can also use Chinese egg noodles. I find the Pancit Canton from the Philippines a little salty so I prefer to use the Chinese egg noodles
PANCIT CANTON

3 cloves Garlic,minced
1 medium Onion, chopped 1 cup boiled pork, diced
1 cup shrimp, shelled, deveined and halved
1 medium carrot,julienned
1 stalk Celery, julienned
1 Bokchoy or 1 cup spinach, chopped

Sauce:
2 tsp soy sauce
1 tsp sugar
1 tsp sesame oil
1 tsp Chinese white rice vinegar or distilled vinegar
1 tsp Shao-Hsing wine (Chinese cooking wine)
Pinch of ground white pepper
1 ½ tsp cornstarch
1 cup chicken broth

1. Place the water in a pot and bring to boil over high heat. Add the noodles, stir and cook for 2-4 mins. for fresh noodles and 4-7mins. for dried noodles . depending on the size. Turn off heat and run cold water into the pot and drain.

2. Combine the sauce ingredients and set aside.

3. Heat the oil and add the garlic and stir. When the garlic is golden brown, add the onions and cook for a minute. Add the pork and shrimp. Saute for a minute or until the shrimp turns pink. Add the carrots, celery and Bokchoy stems. When these have softened slightly, add the Spinach and Bokchoy leaves. Make a well in the middle,stir the sauce mixture and pour into the pan. Stir well and cook until the sauce thickens.

4. Add the cooked noodles into the pan and mix until the noodles are coated with the sauce and vegetables are evenly distributed.

5. Serve in a platter with sliced lemons and soy sauce on the side.


SUBSCRIBE BY EMAIL HERE

Read full post >>

What's In My Palayok? Kare-kare

17 April 2008 10 comments

Kare-kare

How I wish I have a palayok in my kitchen. No, I'm not going to use it for cooking since my range is electric. :( I am going to use it for presentation. (Note to self: bring back a palayok from my trip to the Philippines next year). How dramatic can you get if you serve Kare-kare in a palayok? That's how they used to do it in Kamayan and Barrio Fiesta restaurants.

I have some Bokchoy and Chinese green beans in the vegetable crisper and thought of making Kare-kare. I have not cooked it in more than a year so what better time to do it than now. Lucky for me, Ox tails are readily available in our local supermarket. I guess I have to thank the big population of Portugese in the area. :) Make sure you also have Bagoong before you even think of cooking Kare-kare. It is just not complete without it, it is like eating Prime Rib without the Au Jus.

There are two ways to cook Kare-kare: the long way and the easy way. The easy way is using Mama Sita's Kare-kare mix. It's okay, just tweak it to your taste. I for one like the taste of the ground toasted rice. This recipe has been tweaked a little. I got it from the cookbook by Laquian and Sobrevinas.

KARE-KARE ( Meat and Vegetable Stew in Peanut Sauce)

2 1/2 lbs. Oxtail
1 1/2 tsp salt or fish sauce
1 tbsp oil
2 cloves garlic, minced
1/2 medium onion, sliced
1/2 cup atchuete water (1 tbsp atchuete seeds and 1/2 cup water)
2 cups broth (from the oxtail)
3 tbsp peanut butter
2 tbsp ground toasted rice
1/2 lb. Chinese green beans
1/2 lb. Bokchoy
1 med. eggplant, cut into pieces

- Place oxtails in a pot and cover with water. Bring to a boil and simmer until tender.
- Soak atchuete seeds in water for 30 min. Stir and press on the seeds to extract color. Strain and set aside.
- Heat oil in a skillet and saute garlic and onions. Add cooked oxtail and 2 cups broth. Add salt and atchuete water. Simmer for 15 min.
- Take a cup of the broth and stir in peanut butter and toasted rice powder. Add to the pot and bring back to boil and simmer for another 5 min.
- Add green beans and eggplant. Cook another 5 minutes. Add the bokchoy and cook for another 5 min.
- Season with salt or if you prefer, bagoong.


SUBSCRIBE BY EMAIL HERE

Read full post >>

Escabeche

15 April 2008 10 comments

Escabeche Escabeche I think is the Filipino version of the Chinese Sweet and Sour dish although the latter has a sweeter and thicker sauce (not to mention redder). Escabeche solely refers to a dish made with fish and the accompanying sauce which has a delicate balance of sweet and sour. To get the perfect Escabeche sauce, it has to be just a little sweet with a hint of sourness to perfectly complement the delicate taste of the fish. Anything more than that will ruin the whole dish.

I've tried a lot of recipes and found some to be overly sweet or too sour. The kind of vinegar that is used is very important. If you are using a recipe from a Philippine cookbook, I suggest using cane vinegar like Datu Puti. This kind of vinegar is not as acidic as the regular distilled vinegar.

Using whole fish adds a special touch, the dish looks nice when you serve it. Some Americans are queasy when they see whole fish served on the table, what more if they see a whole lechon? I can just imagine my MIL when she sees a lechon complete with the head. She will probably swear off on eating any kind of pork for life. LOL I'm thankful that dh is not like that. Here in our local grocery, they only sell fillets of fish. So every time we go to the Asian grocery near Boston, I always get a whole fish. This time I got a whole Lane Snapper, just the perfect size for the family.

Escabeche
I used an oval-shaped pan to fry the fish. This was the reason I purchased this pan in the first place (NO, I am not a fan of Rachel Ray LOL). I've used the regular round pan and fishes this size don't fit (unless you have a huge kawali from the Philippines :)).


ESCABECHE (Pickled Fried Fish)

1 medium sized fish, cleaned
2 tsp salt
1/2 lemon
1/3 cup oil
2 cloves garlic, minced
1 small onion, sliced
1/2 green pepper, cut into strips
1 tbsp ginger strips
1 carrot, cut into strips
1/4 cup vinegar
1/2 cup water
1/4 cup sugar
1/2 tsp salt
1 tbsp soy sauce
2 tbsp catsup
1 tsp cornstarch, dissolved in 2 tbsp water

*Rub fish all over with lemon. Sprinkle with salt and let stand for half an hour.
*Fry in oil until brown. Set aside.
*Saute garlic, ginger and onions until onions are translucent. Add carrots and saute for 3 mins. Add the green pepper and saute for another 2 mins.
*Add sugar, salt, soy sauce and catsup to the water and mix until dissolved. Pour into the pan with the vegetables. Add vinegar and bring to boil.
*Stir in cornstarch solution and cook until thick and transparent.
*Pour sauce over the fish and serve with white rice.

Source: Filipino Cooking by E.Laquian and I.Sobrevinas


SUBSCRIBE BY EMAIL HERE

Read full post >>

Polvoron Just Like Goldilocks

13 April 2008 18 comments

PolvoronWhen we were still living in California, we were spoiled with having a Goldilocks store in the next town. Whenever dh had some craving for polvoron, we'd drive to Union City and stock up on different pastries. Whenever I or any of my relatives go back to Manila for a vacation, we would bring packs of polvoron as 'pasalubong' for dh and the kids.


Polvoron Molds Now that we live in the East Coast, getting Goldilocks polvoron is not that easy. There are some stores in New Jersey and New York that sell these but of course it costs more and I live four hours away.:( Goldilocks also has an online store but then the shipping costs more than the product you are ordering since they only ship 2nd-day Air. So we just ask my cousin who lives near a Goldilocks store in Southern California to buy the polvoron and ship it to us. It is not cheap either. One bag (12 pcs.) costs $15, they sure have a big profit margin on this one. This set-up worked out fine until the last shipment.


Polvoron
It tasted different this time. Dh noticed it too. Gone are the rich and buttery taste. Now it is bland and dry. Because of this, I decided to make my own polvoron. And why not? I remember making this during Home Economics in sixth grade. :) I also have the polvoron molds sitting in a drawer, I asked my mom to get these for 3 years ago. I have not used it since I received it, I guess I'd better start now.


These polvoron tastes just like Goldilocks'. Making it is very easy and definitely costs less $. I used a stand mixer to incorporate the rest of the ingredients into the flour, it is much easier that way. The kids enjoyed helping me make the polvoron. It is very easy for them with the help of the mold. If you would like to wrap these, you can use 'tissue paper' (like the ones you use for gift bags).


Polvoron

1 cup sifted All-purpose flour
1/2 cup full-cream powdered milk (KLIM or Nido)
1/2 cup sugar
1/2 cup soft butter
1/2 tsp vanilla extract

-Toast the flour in a pan over medium heat.

-Stir continuously until light brown.
-Transfer the toasted flour to a mixing bowl.
-Add the rest of the ingredients to the bowl and mix
well.
-Use the polvoron mold to form the mixture.
-Refrigerate for at least 30 minutes.

Variations:

Pinipig Polvoron:
Add 1/4 cup toasted Pinipig

Chocolate Polvoron:
3/4 cup All-purpose flour
1/4 cup sifted cocoa powder
1/2 cup full cream powdered milk
3/4 cup sugar
1/2 cup soft butter

*** I'm expecting a shipment of polvoron molds this summer. Send me an email at kusineraUSA at yahoo dot com to place an order. ***


Subscribe to receive more recipes by email. You will only get emails when there is a new recipe posted. No SPAM or adverts. SUBSCRIBE BY EMAIL HERE

Read full post >>

Filipino Spaghetti, A Taste from My Childhood

26 March 2008 10 comments

Filipino Spaghetti
Usually a staple in birthday parties in the Philippines, this became one of my favorite eats along with the Purefoods hotdog on a stick with marshmallows and the slice of birthday cake. Filipino spaghetti is distinctively different from the Italian kind because it has hotdogs/frankfurters and it is sweet which usually comes from the added tomato catsup or banana catsup. My kids never took to liking it, probably because they are used to the Italian-style spaghetti sauce that I cook. Hubby prefers the Italian version, I can't blame him though since he is part Italian. :)

Once in a while, when I make Italian spaghetti sauce for my family, I will save some and add hotdogs and UFC catsup for my own Pinoy spaghetti. For true Pinoy spaghetti taste, use grated Kraft cheddar cheese for the topping.


Note: Condensed milk is not used in making the spaghetti sauce.


Filipino Spaghetti Sauce


1 cup chopped yellow onions
2 cloves garlic, minced
1 lb ground beef
2 small cans tomato sauce
1 cup banana catsup (Jufran, UFC or Mafran brand)
1/8 Tsp pepper
2 tbsp sugar
1 tsp parsley
1 pack hotdog or frankfurters, sliced thinly
1/2 cup water
1 Tbsp olive oil
1 Tbsp oregano
1 cup grated Kraft cheddar cheese or any mild cheddar cheese

Saute the garlic, onions in oil until wilted, add the ground beef and cook for 10 minutes, drain excess oil. Add tomato sauce and water. Add the oregano and parsley, season with salt and pepper. Stir and simmer for about an hour. Stir the sauce often so it will not stick to the pan. Add the banana catsup and hot dog at the last 10 minutes of cooking. Mix sauce with cooked spaghetti. Sprinkle grated Kraft cheddar cheese before serving.

Shortcut version:
Saute garlic, onions and ground beef, drain excess oil. Add any bottled spaghetti sauce, add about a cup of banana catsup and sugar to taste. Add hotdogs or frankfurters. Cook for 30 minutes while stirring often. Mix the sauce with the cooked spaghetti noodles and top with grated mild cheddar cheese.


SUBSCRIBE BY EMAIL HERE

Read full post >>

Pancit Molo Recipe

18 March 2008 8 comments

Pancit MoloPancit Molo is an adaptation of the Chinese Won-Ton soup. This Philippine dish has it's origin from a city in Iloilo called Molo. Do you know that in Iloilo, the first letter of your surname is the same as the city/town you're from? Interesting factoid. :) My maternal grandfather's real surname (he was adopted later and used his adopted family's surname) started with the letter D and he was from a town called 'Dingle' (deeng-leh).

Anyway, back to Pancit Molo and soups. My family and I love eating different variations of soup during winter, my favorite soup to make is some kind of noodle soup. Everytime I have pork filling left-overs from making Lumpia Shanghai, I make it into siomai or wonton and use this to make Pancit Molo.
Uncooked siomai
To make the siomai, I use ground pork, minced carrots, flat-leaf parsley, onions with salt and pepper plus one egg to act as a binder. I wrap it using small squares of pastry made exclusively for wontons. Use at the most, one teaspoon of filling per wrapper. Close the edges using beaten egg to make a complete seal. I put a bit of flour on the bottom of the plate where you'll set the siomai so it does not stick to the bottom and to each other.

Pancit Molo Soup For the soup, I saute the garlic and onions. I add several pieces of chicken parts with bones and let it sweat. Afterwards, I add several cups of water and bring it to boil. I skim the impurities out and let it simmer until the chicken is tender. I take out the chicken and cut the meat into strips. Meanwhile, I add the carrot strips and other vegetables I have in the fridge like spinach and celery. Add the siomai to the broth, let simmer for 20 minutes. It is important to just let it simmer because if you have the broth boiling, the siomai might open up if it has not been sealed well.

Season to taste with pepper and either salt or fish sauce. Add the cooked chicken and minced green onions before serving. If you prefer, you can add noodles to Pancit Molo (just like I did). Add the noodles to the broth at the last 5minutes of cooking (depending on how long the noodles will cook).

As you may have noticed by now, almost all the dishes I cook make use of only one (or two at the most) pot or pan. Is it obvious that I hate to wash dishes? LOL Thank goodness for the dishwasher, one of the best (second only to the washing machine) inventions for the household. Anyway, if you're into washing pots and pans, you can make the chicken broth ahead of time (but why bother when you can do it in the same pot - that's always my opinion).

Pancit Molo Recipe

Filling:
1/2 lb. ground pork
1 carrot, chopped
1 tbsp minced parsley
1 egg
salt and pepper to taste

Broth:
1 tbsp. oil
3 cloves garlic, minced
1/2 onion, chopped
1/2 lb chicken bones
salt and pepper to taste
green onions, chopped (for garnish)


SUBSCRIBE BY EMAIL HERE

Read full post >>

Halabos na Hipon

07 March 2008 9 comments

Hipon

Usually the most delicious food comes from a very simple recipe, Halabos na Hipon is one of them. This is my number one favorite shrimp recipe. It is comparable to shrimp Scampi of the Italians or Gambas al Ajillo of Catalonia.

The only time I make Halabos na hipon is when I have whole shrimps from the Asian grocery. All the flavors to make this a great dish comes from the head. The shrimp products we have in the local grocery or the club store are the headless shrimps, I wonder what they do with the discarded shrimp heads?

Halabos na Hipon
The way my mom taught me to cook this dish is very simple. Place the shrimps in a saute pan with just a little water. Add salt and pepper. Once it starts to boil, saute it for about 2 minutes for medium-sized shrimps and around 3-5 minutes for larger shrimps. At the last minute of cooking, add a teaspoon of canola or olive oil to finish the dish.

I prefer my Halabos na hipon to have a lot of sauce so I use more water. :) This goes well with freshly cooked rice or French bread. Yummy!


SUBSCRIBE BY EMAIL HERE

Read full post >>