Showing posts with label Meat. Show all posts

Pineapple Sweet and Sour Meatballs

03 February 2009 6 comments

Sweet and Sour Meatballs
PINEAPPLE SWEET AND SOUR MEATBALLS
This is one of those fast meals that I whip up when I don't have much time to spend in the kitchen. What's nice about this recipe is you can skip making the meatballs from scratch and use the frozen Italian or Swedish meatballs in the freezer. Of course, if you're feeling like Martha Stewart, then by all means, go ahead and make it from scratch. :o) I found the original recipe online but tweaked it to suit my taste. I added catsup (the sauce needed more color), lessened the brown sugar (too sweet) and vinegar (too sour), etc. That's what's good about cooking, you can change a recipe according to your taste. Here's my final (for now) recipe:


Pineapple Sweet and Sour Meatballs

Meatballs:

1 lb ground beef
1 egg, beaten
1/2 cup panko or bread crumbs
1 small onion, minced
1 tsp salt
1/4 tsp ground black pepper
1 tsp Worcestershire sauce

Preheat oven to 350 deg F. Lightly oil a jelly roll pan or cookie sheet. Mix the ingredients for the meatballs. Shape into small balls and bake for 30 mins or until fully cooked.


Pineapple Sweet and Sour Sauce:
1 can pineapple chunks, drained
1 med carrot, sliced thin (so it will cook quickly)
1 red bell pepper, cut into squares
1 small onion, quartered
3/4 cup pineapple juice (you can use the juice from the pineapple chunks)
1/3 cup water
1 tbsp vinegar
1 tbsp soy sauce
1/4 cup brown sugar
1/3 cup catsup
3 tbsp cornstarch dissolved in 1/3 cup water
salt if needed


While the meatballs are in the oven, prepare this sauce. In a medium sauce pan, mix pineapple juice, water and soy sauce. Bring to boil. Add the vinegar but do not mix. Bring it up to boil then mix. Add brown sugar and catsup and mix until the sugar is dissolved. Throw in the carrots, onions, pineapple and red bell pepper.
Add the cornstarch/water mixture a little at a time thoroughly mixing after each addition. Stop adding the mixture when it's at the consistency you prefer. Try the sauce and add salt to suit your taste.

You can serve the meatballs mixed in with the sauce or serve the sauce on the side. You can pair this with steamed rice or cooked pasta.

SUBSCRIBE BY EMAIL HERE

Read full post >>

Mexican Taco Pie

31 January 2009 2 comments


MEXICAN TACO PIE

My family loves Mexican food. I always make beef Tacos, Enchiladas, Carne Asada and Chimichangas. I wanted to make something new so I tried this recipe. I made a couple of modifications to suit my family's taste. You can make this sans refried beans. If you like salsa, then by all means, add it as another layer.


Mexican Taco Pie
1 lb. lean ground beef
1 medium onion, chopped
1 can Refried Beans
1 4 oz. can chopped green chilies
1 pkg. taco seasoning 1 pkg. flour tortillas
2 c. shredded shredded Mexican mixed cheese
1. Grease a pie pan with oil. Pre-heat the oven to 350 deg F.
2. Saute onions in a little oil. Add ground beef and a pinch of salt and pepper. Cook until brown. Strain the cooked ground beef to take out excess oil.
3. Return to heated pan. Prepare the taco seasoning according to the directions on the packet. Add to the cooked ground beef. Simmer for 5 minutes. Set aside. 4. Place two pieces of tortillas on the bottom of the pan. Spread some refried beans evenly on the tortillas. Follow with the ground beef. Sprinkle some green chilies on top, then the Mexican shredded cheese.
5. Place two more pieces of tortillas on top and repeat with the refried beans, ground beef, green chilies, cheese. Do this until you reach the top of the pie pan. 6. Sprinkle some extra cheese on the top to get a crunchy topping or you can place one layer of tortilla then the cheese if you want an extra crunchy top.
7. Bake for about 30 minutes when everything is all bubbly and crunchy.
8. Let cool for 5 minutes and slice. Serve hot.


SUBSCRIBE BY EMAIL HERE

Read full post >>

Falling Off the Bones Back Ribs

20 January 2009 8 comments


I served this Barbequed pork baby back ribs on my daughter's birthday party last weekend. I forgot to take a proper photo (!), good thing I saw a photo of one of the guests holding this plate with the ribs. LOL Anyway, it is REALLY good. I got a lot of compliments about it. The good thing is that you use a slow-cooker for this, isn't that great? By the time the ribs are done, it is literally falling off the bones, hence the title of this post. Try it and you'll see what I mean. Here is the recipe.


Ingredients:
4 pound pork baby back ribs
salt and pepper to taste
1 1/2 cup Barbeque sauce
1 1/2 cup ketchup
1/4 cup packed brown sugar
2 tablespoons vinegar
2 teaspoons dried oregano
2 teaspoons Worcestershire sauce
1 dash hot sauce

Directions:
1. Preheat oven to 400 degrees F (200 degrees C).
2. Season ribs with salt and pepper. Place in a shallow baking pan. Brown in oven 15 minutes. Turn over, and brown another 15 minutes; drain fat.
3. In a medium bowl, mix together the barbeque sauce, ketchup, brown sugar, vinegar, oregano, Worcestershire sauce, hot sauce, and salt and pepper.
4.Place ribs in slow cooker. Pour sauce over ribs, and turn to coat.
5. Cover and cook on Low 6 to 8 hours, or until ribs are tender.


SUBSCRIBE BY EMAIL HERE

Read full post >>

Osso Buco - My Favorite Italian Dish

08 November 2008 8 comments

KusineraUSA Osso Buco

I've seen this dish prepared by TV chefs all the time but have not tried cooking it. While in Italy last summer, I tried Osso Buco for the first time at a restaurant in Florence named La Bussola Ristorante Pizzeria and I was in heaven. You can see in the photo below that it was served with steamed rice and the sauce La Bussola Osso Bucohas A LOT of tomatoes. I love tomatoes so I didn't mind it at all.

If you're not familiar with Osso Buco, it is a regional dish from Piedmont in Italy. It is made with veal shanks although if that is not available, you can substitute beef shanks instead. For the dry white wine, I used Chardonnay since that's what's readily available in my fridge. I also used canned tomatoes.
This recipe is from Epicurious.com and I found it to my liking. It is the classic version of Osso Buco. I omitted the orange zest since I don't remember tasting it in Italy., You can also use the crockpot in cooking this. You only need to brown the shanks and saute the veggies on the stove top first before adding all of the ingredients to the crockpot. This recipe is a keeper. It is as close to the Osso Buco I had in Florence and I will definitely make it again.

CLASSIC OSSO BUCO
4 pounds (1.8 kg) veal shanks, cut in 1 1/2-inch ( 4 cm) slices
1/4 cup (30 g/1 oz) flour
salt and pepper
2 tablespoons olive oil
2 tablespoons butter

2 onions, chopped
1 carrot, chopped
1/2 bottle (375 ml) dry white wine
a 14.5-ounce (435 g) can plum tomatoes, chopped
2 garlic cloves, chopped
grated zest of 2 oranges (I omitted this)
1 cup (250 ml/8 fl oz) veal stock, more if needed

1. Heat the oven to 350°F (176°F/Gas 4). Put the flour on a plate, add generous amounts of salt and pepper, and coat the veal slices, with flour, patting to remove the excess. Heat the oil and butter in a sauté pan or frying pan big enough for all the veal slices to touch the bottom. Add half the slices and brown them over quite high heat, 2 to 3 minutes. Turn them, brown the other side and remove them to a plate. Brown the remaining slices and remove them also.

2. Lower the heat to medium, add the onion and carrot and sauté until golden, 5 to 7 minutes. Pour in the wine and boil until reduced by half, stirring to dissolve the pan juices. Stir in the tomatoes, garlic, orange zest, veal stock, salt, and pepper. Immerse the veal slices in this sauce — the liquid should come at least halfway up the sides. Cover the pan and bring it to a boil.

3. Braise the shanks in the oven until the meat is very tender and falling from the bone, 1 1/2 to 2 hours. Stir from time to time, gently turning the slices, and if the pan seems dry, add more stock. At the end of cooking, taste and adjust seasoning of the sauce. Osso buco can be cooked ahead and stored up to 3 days in the refrigerator, or frozen. Keep it in the pan ready to be reheated on top of the stove.

SUBSCRIBE BY EMAIL HERE

Read full post >>

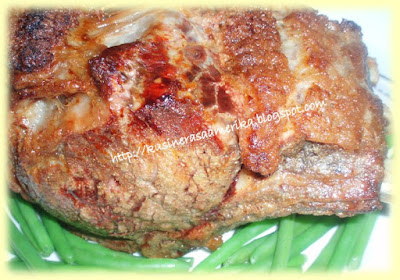
Pork Loin with Mushroom Sauce

07 September 2008 6 comments


This is a Roast Pork dish that is usually served by our catering business in Pasig. It's simple to make yet elegant enough to serve in parties.You have to start with a good cut of lean Pork Loin, it has to be large enough so it won't disintegrate when you cut it after it had been tenderized. We don't have a special name for this dish. We call this dish 'pork loin with mushroom sauce'. Big thanks to my mom for teaching me how to make this dish.

Ingredients:
1 large slab of lean Pork Loin
salt and pepper
4 tbsp cooking oil
1/2 can of small tomato paste
5 cups of chicken stock
1 stick of butter
1 small onion, minced
2 tbsp flour
1 cup broth from the cooked pork loin
1 small can of Cream of Mushroom (use regular not low fat)
1 cup grated cheese (any kind)

Wash and dry the pork loin. Season with salt and pepper. Heat cooking oil in a large pot, brown all sides of the pork loin. Add the tomato paste and scrape the browned bits off the bottom of the pan. Add the chicken stock and stir until the tomato paste is dissolved. Cook until the pork loin is tender, stirring the pot once in a while and adding chicken stock if the liquid becomes too low. Set aside 1 cup of the broth to be used in the next step.

Heat the oven to 350 deg F.

In a smaller pot, in medium heat, add butter. When butter is melted, saute the onions until it's cooked but not browned. Add the flour and cook for a minute or two. Then add the broth (that was set aside from the pork loin) a little at a time to prevent lumps. Wait for it to boil. When it's boiling, add the Cream of Mushroom and stir thoroughly.

Take the roast pork loin and cut it into 1/4 inch slices. Set aside. In a pyrex dish, pour 1 cup of the sauce on the bottom. Arrange the roast pork loin slices in the pyrex dish. Pour more sauce on top of the pork loin. Sprinkle the grated cheese on top of the pork loin. Bake in the oven for about 10-15 minutes, just enough for the pork to be reheated through and the cheese to melt. Serve with rice.
SUBSCRIBE BY EMAIL HERE
Read full post >>

Filipino Pork Barbeque

17 August 2008 16 comments

Having pork barbeque signifies the start of the warm weather for me. I live in the part of of the country where there are four seasons and grilling in the middle of winter is not an option (although I tried it once, crazy me!) There are hundreds of recipe variation of pork barbeque. One can basically make their own recipe and call it the same name. This is similar to Teriyaki or Korean barbeque but what sets Filipino pork barbeque from the rest I think is the sweetness from the banana ketchup (you read that right, a ketchup made from bananas.) A typical Filipino pork barbeque has some fat on it. Since dh does not like fat, I make a couple of pieces for him that is all lean meat. It's also important to grill this on medium heat so it will not end up all burnt and crisp. If using a tough part of the pork, you can add some type of lemon soda to the marinade to act as a tenderizer. I prefer to marinate the meat for half a day or a minimum of two hours.

FILIPINO PORK BARBEQUE

2 lbs. pork shoulder, sliced into strips (approx. 1-in wide and 1/2-in thick)
6 cloves garlic, crushed
2 cups light soy sauce
1/4 cup brown sugar
1/2 tsp pepper flakes (can be adjusted to your taste)
juice of 1 lemon
2 tsp Worcestershire sauce
1/2 cup banana ketchup (regular ketchup can be used)
barbeque stick

Marinate the pork in the mixture for a couple of hours. Soak the barbeque stick in water for 5 minutes, this will prevent it from burning. Drain the pork and set aside the marinade. Put the meat in the stick, 2-3 strips per stick.
Cook it in the grill over medium heat, using the marinade as a basting sauce. At the last 5 minutes of cooking, do not baste the pork, just let it finish cooking. Do not overcook, the meat will be tough.

Note:
- this marinade can also be used for chicken
- Banana Ketchup can be purchased in any Asian store that carries Philippine products. (Brands: UFC or Jufran)

SUBSCRIBE TO RECEIVE MORE RECIPES BY EMAIL. YOU WILL ONLY GET EMAILS WHEN THERE IS A NEW RECIPE POSTED. NO SPAM OR ADVERTS. SUBSCRIBE BY EMAIL HERE

Read full post >>

Beef with Broccoli

10 August 2008 8 comments

Someone emailed me and asked me for a quick recipe that can be made with vegetables and meat. This is my 'fall back' dish whenever I'm in a rush or just too lazy to think of what to cook for dinner. This very basic dish can be made with any available ingredients in your fridge. For this recipe, I used beef tri-tips and broccoli. I blanched the broccoli in boiling water for one minute to keep the bright green color. You can adjust the amount of oyster sauce depending on your taste and the kind of chicken stock you use (canned stock are already salty.)

2 long strips of beef tri-tip, sliced thinly about 2-in. long
2 bunches of broccoli, cut into pieces and blanched for 1-min. in boiling water
1/4 onion, sliced thinly
1 garlic clove, minced
2 tbsp Oyster sauce (Lee Kum Kee brand, for example)
2 tsp Chinese rice wine (or sweet rice wine like Mirin)
1 tsp sugar
1 tbsp cornstarch
1/3 cup chicken broth
1 tsp sesame oil
pinch of chili pepper flakes (optional)
1 tbsp canola oil

Mix oyster sauce, rice wine, sugar, cornstarch, chicken broth, sesame oil and ground pepper, set aside. Heat oil in a large pan or skillet. Saute garlic and onions over medium heat until limp. Add beef strips and chili pepper flakes, cook until no longer pink (this cooks quickly since it is sliced thin). Add broccoli pieces, and cook until broccoli stalk is tender but still crunchy, about 4 minutes or less. Add the sauce mixture, stir and mix until it thickens, about 1-1/2 minutes. Serve with steamed rice.

Tip: I purchase the family-size beef tri-tips pack and use the FoodSaver vacuum system to re-pack it in small portions, each pack is just enough for one dish.
SUBSCRIBE BY EMAIL HERE

Read full post >>

Beef Caldereta

05 May 2008 10 comments

Caldereta As with most Filipino food, Caldereta originated in Spain. They have the same dish and almost all the ingredients are similar with the exception of Cinnamon stick, which is called for in the Spanish recipe. This dish can be made with beef, goat meat or even chicken. I prefer using beef for my version of Caldereta. Some recipes call for the use of vinegar as a marinade, along with salt, garlic and pepper. This is advisable if you are using a tough part of the beef as vinegar acts as a meat tenderizer.

Browning the beef as the first step of the cooking is very important. Do not use a non-stick pot or pan for this since you want the brown bits that stick to the bottom of the pan. These will add a lot of flavor to your Caldereta (or any kind of beef stew). Instead of tomato sauce, I prefer to use tomato paste (about 2-3 tbsp depending on how much water you add and how much sauce you want at the end) since I find that the resulting sauce has more depth and flavor. It is also important to let it simmer for a long time since this will allow all the flavors to meld and make the sauce thicker (you don't want a sauce that is watery).


The nice thing about Caldereta is you can omit some or most of the ingredients. As long as you have beef and tomato sauce, you'll still end up with a good dish. It's okay if you don't have liver sauce or olives or green peas. I for one do not add green peas, just because dh does not like it. If you like a Caldereta with a kick, add some chili pepper flakes or chili peppers.

This recipe is a combination of recipes from my mom, aunts and cook books. You can tweak this recipe to accomodate your taste


BEEF CALDERETA
Coooking Caldereta
2 lbs beef cubes
1/4 cup soy sauce
1 tbsp garlic, crushed
1/2 tsp ground pepper
1/4 cup cooking oil
1 medium sized onion, chopped
1 can tomato sauce
1 3/4 cups water
2 tsp Worcestershire sauce
additional 2 1/2 cups water Caldereta
3 medium-sized potatoes, quartered

1 large carrot, chopped
1 red Bell pepper, chopped
1 tsp salt
1/4 cup canned liver spread
1/2 cup green peas
1/2 cup whole olives (optional)
Chili pepper flakes (optional)


- Marinate the beef in soy sauce, garlic and pepper for at least 1 hour. Drain and reserve the marinade.
- Heat the oil in a large pot.
- Fry the beef cubes until brown in all sides. Set aside.
- Add the onion and saute until limp. Caldereta
- Pour in the tomato sauce, water, Worcestershire sauce and reserved marinade.
- Bring to boil and then lower the heat to simmer until the beef cubes are tender (approximately 1 1/2 hours). Add more water if needed. You should end up with an oily and thick sauce just like what is shown in the photo at the right. Skim the fat off the sauce.
- Add potatoes and carrot, cook for 10 minutes.
- Add Bell pepper and cook for another 5 minutes.
- Add the rest of the ingredients. Add salt if needed.
-Serve over rice.

Subscribe to receive more recipes by email. You will only get emails when there is a new recipe posted. No SPAM or adverts. SUBSCRIBE BY EMAIL HERE

Read full post >>

Pepper Steak

01 May 2008 7 comments

Pepper Steak over Egg Noodles

There are days where I don't know what to cook for dinner. Have you ever had one of those days? You have a lot of choices that you don't know for the life of you what to make. Those are the times when I get 'bold' and try new things. This recipe was on the bag of the egg noodles and it turned out very tasty. It is so easy to make and does not take a lot of preparation time.


I used beef tri-tips for this recipe and sliced it thinly so the cooking time is shortened. I also reduced the amount of water, beef bouillon and cornstarch since I only need to cook for 2 adults and 2 kids. Any kind of pasta will work for this dish, use whatever you have.
PEPPER STEAK OVER NOODLES
1 lb. boneless beef round or shoulder steak, sliced thinly
1 tbsp cooking oil
1/2 tsp salt
1 medium sized onion, sliced
1 clove garlic, minced
2 beef bouillon cubes
2 cups boiling water
2 tbsp Worcestershire sauce
1 green or red Bell pepper, cut into strips
2 tbsp cornstarch
1/4 cup water
3 fresh tomatoes, sliced
4 1/2 cups wide egg noodles, (6 oz) uncooked
-Cook egg noodles according to package directions; drain well. Set aside.
-Brown meat in oil in large skillet; season with salt.
-Add onion and garlic; cook until onion is tender.
-Add meat and cook 1 minute.
-Dissolve bouillon cube in 2 cups boiling water; add with Worcestershire sauce to the meat. Cook until meat is tender.
-Add Bell peppers and simmer 5 minutes longer.
-Combine cornstarch and 1/4 cup water; gradually stir into meat mixture.
-Cook, stirring constantly, until sauce thickens and begins to boil.
-Add tomatoes; heat through.
-Serve pepper steak over noodles.
4-6 servings.


SUBSCRIBE BY EMAIL HERE

Read full post >>

What's My Steak? Bistek

28 April 2008 15 comments

Filipino Beef Steak

You would think that having been living here in the US for 19 years, I would swear off eating Philippine beef steak. Uh-uh, I still crave for Bistek as I call it from my younger days. I like the salty sauce on top of piping hot rice and the crunchiness of the onions with the beef. They say that this is the poor man's steak, I don't know about that since beef round and tenderloin are so expensive.

The type of soy sauce that you use is crucial to this dish. Use soy sauce that is not too salty. I find that Silver Swan brand is too salty for me so I use Marca Pina. I have not tried using Kikoman Lite Soy Sauce for this but I would guess that it will turn out fine since it's not too salty like the original. Using Vidalia onions is also recommended since the sweetness of these type of onions complement the saltiness of the sauce. If you are using a part of the beef other than the round, I suggest you pound the beef slice with a mallet or something similar to tenderize it. I remember my mom using the back of the knife to pound the beef, so it's not cutting through the meat. As with any cooking recipe, this can be tweaked according to your taste.

PHILIPPINE BEEF STEAK "BISTEK"

1 lb. Beef round or tenderloin, sliced thin
1/2 cup soy sauce
Juice of 1 lemon
ground pepper
1 big onion, sliced across so you'll end up with rings

1. Mix soy sauce, ground pepper and lemon juice in a big bowl.
2. Add the sliced beef and mix with your hands. Let sit in the fridge for 30 min.
3. Heat oil in a big pot.
4. Fry the onions up to the consistency you prefer. I prefer my onions to be soft, some like it crunchy. Set aside.
5. Fry the beef but do not over cook. Remember that the beef slices are thin so it does not take long for it to cook. Over cooking the beef will result in tough and dry meat. Set aside the cooked meat while you're cooking the rest of the meat.
6. Pour the sauce in the pot and cook for 2 minutes.
7. Arrange the beef slices in a serving bowl and put the cooked onions on top. Pour the cooked sauce over the meat and onions.
8. Serve over hot rice.

SUBSCRIBE BY EMAIL HERE

Read full post >>

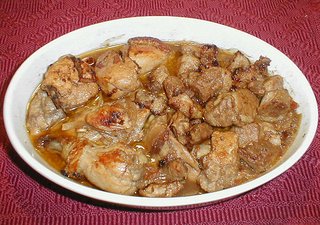
What's In My Palayok? Kare-kare

17 April 2008 10 comments

Kare-kare

How I wish I have a palayok in my kitchen. No, I'm not going to use it for cooking since my range is electric. :( I am going to use it for presentation. (Note to self: bring back a palayok from my trip to the Philippines next year). How dramatic can you get if you serve Kare-kare in a palayok? That's how they used to do it in Kamayan and Barrio Fiesta restaurants.

I have some Bokchoy and Chinese green beans in the vegetable crisper and thought of making Kare-kare. I have not cooked it in more than a year so what better time to do it than now. Lucky for me, Ox tails are readily available in our local supermarket. I guess I have to thank the big population of Portugese in the area. :) Make sure you also have Bagoong before you even think of cooking Kare-kare. It is just not complete without it, it is like eating Prime Rib without the Au Jus.

There are two ways to cook Kare-kare: the long way and the easy way. The easy way is using Mama Sita's Kare-kare mix. It's okay, just tweak it to your taste. I for one like the taste of the ground toasted rice. This recipe has been tweaked a little. I got it from the cookbook by Laquian and Sobrevinas.

KARE-KARE ( Meat and Vegetable Stew in Peanut Sauce)

2 1/2 lbs. Oxtail
1 1/2 tsp salt or fish sauce
1 tbsp oil
2 cloves garlic, minced
1/2 medium onion, sliced
1/2 cup atchuete water (1 tbsp atchuete seeds and 1/2 cup water)
2 cups broth (from the oxtail)
3 tbsp peanut butter
2 tbsp ground toasted rice
1/2 lb. Chinese green beans
1/2 lb. Bokchoy
1 med. eggplant, cut into pieces

- Place oxtails in a pot and cover with water. Bring to a boil and simmer until tender.
- Soak atchuete seeds in water for 30 min. Stir and press on the seeds to extract color. Strain and set aside.
- Heat oil in a skillet and saute garlic and onions. Add cooked oxtail and 2 cups broth. Add salt and atchuete water. Simmer for 15 min.
- Take a cup of the broth and stir in peanut butter and toasted rice powder. Add to the pot and bring back to boil and simmer for another 5 min.
- Add green beans and eggplant. Cook another 5 minutes. Add the bokchoy and cook for another 5 min.
- Season with salt or if you prefer, bagoong.


SUBSCRIBE BY EMAIL HERE
Read full post >>

Prime Rib, A Meatlover's Delight

05 April 2008 3 comments

Prime Rib You would think that the best Prime Rib I've ever tasted was in some fancy restaurant in San Francisco or Boston. It wasn't. Dh and I were visiting friends in Kingman, Arizona and we went to this restaurant on top of the mountain. It is not a fancy schmanzy restaurant with waiters dressed in black-tie. It is just your run-of-the-mill mom and pop run place. But wait till you try their Prime Rib, it just melted in your mouth. THE BEST!

After that experience, I've always been in the hunt for the perfect recipe. I'm an avid-watcher of Alton Brown's show 'Good Eats' on the Food Network. He did a show on Prime Rib. If you've watched Alton, you know that he uses a variety of techniques. Some of his techniques and/or tools will make you scratch your head and wonder if that will really work. This is one of those shows, he used a terra-cotta pot to cover the meat. If I had a clean one with no plants in it, I would've probably tried it too. But then, I don't have a clean one so I just used a regular roast pan with a cover.

I cooked this standing rib roast for Easter Dinner. I bought a four-bone roast which is more than enough for our family. I adjusted the cooking time since we want our meat medium. The ends of the prime rib came out medium-well which is just right for the kids.

Dry-Aged Standing Rib Roast


1 (4-bone-in) standing rib roast, preferably from the loin end
Canola oil, to coat roast
Kosher salt
Freshly ground pepper, to cover entire roast

1 cup water
1 cup red wine
4 fresh sage leaves

Preparation Three Days Before Cooking:
Remove any plastic wrapping or butcher's paper from the roast. Place the standing rib roast upright onto a half sheet pan fitted with a rack. The rack is essential for drainage. Place dry towels loosely on top of the roast. This will help to draw moisture away from the meat. Place into a refrigerator at approximately 50 to 60 percent humidity and between 34 and 38 degrees F. You can measure both with a refrigerator thermometer. Change the towels daily for 3 days.

Turn the oven to 250 degrees F.


Remove the roast from the refrigerator and rub with canola oil. Remember to rub the bones with oil, as well. Once the roast is completely coated with oil cover the roast with salt,about half a teaspoon per bone.


Next, rub with freshly ground pepper to coat the surface.

Place the roast over a glass bake-ware dish slightly smaller than the length of the roast. This will catch the drippings needed for the sauce.

Finally, place a probe thermometer into the center of the roast and set for 118 degrees. Put the roast and the bake-ware dish into the oven. Turn the oven down to 200 degrees F and roast until internal temperature is achieved.


Remove the roast and turn oven up to 500 degrees F.

Remove the lid and re-cover with heavy-duty foil. Allow the roast to rest until an internal temperature of 130 degrees F. is reached.

Place the roast back into the preheated 500 degree F oven for about 10 minutes or until you've achieved your desired crust.

Remove and transfer roast to a cutting board. Keep covered with foil until ready to serve.

Degrease the juices in the glass pan. Place the pan over low heat and deglaze with 1 cup of water.

Add the wine and reduce by half.

Roll the sage leaves in between your fingers to release the flavors and aroma. Add to the sauce and cook for 1 minute.

Strain and serve on the side.


SUBSCRIBE BY EMAIL HERE

Read full post >>

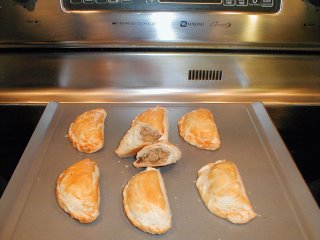
Pineapple Glazed Ham and Ceasar Salad

23 March 2008 7 comments

Ceasar Salad
I received a tag from Liz of Mommy's Little Corner. :)

We had Ceasar Salad and Baked Ham last night (Holy Saturday) for dinner. Ceasar Salad is our favorite, we actually have this served in our wedding reception at Wente Vineyards restaurant. They served the hearts of Romaine whole with Parmesan shavings and croutons.

I like to make the Ceasar dressing from scratch. To limit the risk of Salmonella (the original recipe calls for raw egg yolk), I use the yolk from a soft-boiled egg.

Ceasar Salad Dressing

1 egg yolk
2 gloves garlic, crushed
2 teaspoons Dijon mustard
2 pcs. anchovy fillets, chopped
2 tablespoons white wine vinegar
1 tablespoon Worcestershire sauce
3/4 cup extra-virgin olive oil
Romaine lettuce
Croutons
Parmesan cheese shavings


In a blender or food processor, place egg yolk, garlic, Dijon mustard, anchovies, vinegar, Worcestershire sauce, salt & pepper. Blend for 20 seconds until smooth. With the motor running, add the extra-virgin olive oil slowly to make the dressing thick & creamy.

Drizzle over the Romaine lettuce and croutons. Top with Parmesan shavings.

Pineapple Glazed HamPineapple Glazed Ham

1 smoked bone-in ham (14 to 16 pounds)
4 cups pineapple juice
1-inch piece fresh ginger, peeled and sliced
4 cloves of garlic, peeled and smashed
12 to 16 whole cloves
1/4 cup Dijon mustard
1 cup light-brown sugar
About 10 pineapple rings

1. Combine the pineapple juice, ginger, and garlic in a saucepan. Bring to a boil, reduce the heat to medium-low and simmer 25 minutes, reducing the liquid by half (to 2 cups). Strain and reserve.

2. Preheat the oven to 350°F.

3. Carefully trim the thick rind and all but 1/4 inch of fat from the surface of the ham. With a sharp knife, score a diamond pattern and insert the cloves at the crossed points of the diamonds.

4. Set the ham in a shallow baking pan. Brush the mustard all over the top. Pat the sugar atop the mustard.

5. Starting at the butt end, decoratively arrange the pineapple rings, securing with toothpicks in the centers, working toward the bone. Pour the reserved pineapple juice into the bottom of the pan and place in the oven.

6. Bake for 1 1/2 hours, basting every 15 minutes.

7.When the ham is done, place it on a serving platter and let rest for 15 minutes. Carve into thin slices, beginning at the butt end. Serve warm with pan sauce alongside. Remove the pineapple slices as you carve and serve them with the ham.

*Notes: I added more Pineapple juice in the middle of the baking process.


I am passing this to Mira, Mareng Amy's cooking blog and Mareng Lan's cooking blog


SUBSCRIBE BY EMAIL HERE
Read full post >>

St. Patrick's Day Dinner

17 March 2008 6 comments

To celebrate my dh's Irish heritage, I always serve Corned Beef for St. Patrick's Day (March 17). This is one of those 'no-brainer' dishes that is very easy to prepare. Corned Beef in the Philippines always comes in a can. :) Fresh Corned Beef here in the US is completely different. Most Corned Beef sold in the grocery stores are the 'brisket' kind and that is what I have been using years before. This year though, I'm using the 'eye round' part of the beef which is much leaner. I personally prefer the brisket but dh ends up taking out a lot of it out because of the fat.

The Corned Beef is placed in a pot of water and brought to boil. Lower the heat and let simmer for three to four hours until fork-tender. I also cook the potatoes with the Corned Beef. Make sure you add the potatoes while the water is still cold. If you add the potatoes when the water is already boiling, you will end up with potatoes that are mushy on the outside but still hard on the inside. Cabbage is also part of the dinner and green beans, if you prefer.

Happy St. Patrick's Day to you! :)

Read full post >>

A Simple Roast Pork Loin

17 February 2008 9 comments

Roast Pork Loin


You can never go wrong with a roast, all you need is a calibrated oven for the right baking temperature and a cooking thermometer to check for doneness. It is very important not to overcook the meat, the result will be a dry and unappetizing entree. If you do a lot of cooking, then I suggest investing in a digital cooking thermometer.

One of my dh fave is roast pork loin because the meat is very lean. The recipe I use is very simple. I use salt and pepper to season the meat. Preheat the oven to 375degF. Brown the pork loin on the stove top and then put it in the oven. I use either a cast iron pan or a pan that can withstand the high temp in the oven, this saves me an extra pan to clean.
Cook until done, about 40-50 minutes (do not rely on the cooking time, always check the temperature of the meat). The cooking thermometer should register 150degF. Let the cooked meat rest for at least 10 min., this is important so the juice will have time to settle back into the meat. If you skip this step and you cut into it, you'll see all the juice come out and you will end up with a dry piece of meat.

Roast Pork Loin My family is not big on gravy when it comes to roast pork. They like to pair it up with apple sauce. (Yes, you read that right, my thoughts exactly. LOL For Filipinos, apple sauce is classified under dessert/snack, here in the US and some European countries, they cook and serve pork with apples and other fruits.) I also made wild rice and steamed green beans to complete the meal.
Bon Apetit!

PORK COOKING TIME CHART

ROASTING - in an uncovered, shallow pan at 350° F.
Loin Roast, Bone-in or Boneless: 2-5 pounds - 20 minutes per pound
Crown Roast: 6-10 pounds - 20 minutes per pound
Leg: 3 1/2 pounds- 20 minutes per pound
Shoulder Roast (Butt): 3-6 pounds - 30 minutes per pound
Tenderloin (roast at 425-450° F) : - 20 - 30 minutes per pound
Ribs: - 1 1/2 - 2 hours**


SUBSCRIBE BY EMAIL HERE

Read full post >>

Adobo ng Pasig

29 July 2007

Adobo
If there would be a 'national dish' for Filipinos, I think Adobo would be on top of that list, would you agree? There are different variations of Adobo, depending on which part of the country you're from. Is Humba considered Adobo? It would seem so, they taste the same unless of course it's the version with the black beans.

Adobo is a favorite 'baon' whenever we go on vacation while I was growing up. In the summer, on the way to Baguio or going to the beach. I remember stopping for lunch and there would always be Adobo and kanin along with the sandwiches and chitchiria. It's good to eat even though it's cold, isn't it?

In Pasig, where I'm from, my grandmother will sometimes cook a different version of Adobo. All of the ingredients are the same except for the addition of tomatoes. This results in a more sweeter and tangy Adobo. Instead of putting everything in the pot, the garlic, onions and tomatoes are sauteed first. Then when it's all soft and wilted, the meat is added and sauteed until you see it cooking in it's own juices. The liquid is then added (water, vinegar and soy sauce). It is simmered until the meat is cooked/tender. After it is done, I put it in the oven and broil it until brown. I like it browned and crispy. It can also be done on the stove top but I don't like to deal with the splattering oil. Too messy and hot oil hurts.

I've been trying to make Humba the way my cousin from the province makes it. Her version is dry, no liquid left unless you call the loads of fat liquid. LOL The resulting meat is tender and sweet. Although I can feel my arteries getting clogged while eating the pork. That was before, now I rarely eat the fat portion of the meat unless of course I'm eating Lechon.

Here is the Adobo recipe I used:


Adobo ng Pasig

1 lb. pork, chopped into medium-sized pieces
1/2 cup vinegar
3/4 cup water
6 tbsp soy sauce
1/4 tsp whole peppercorns
1 onion, chopped
2 tomatoes, chopped
6 cloves garlic, crushed
1 tbsp oil

Heat oil in a pan, add garlic and onions, saute until tender.
Add the tomatoes and cook until it is soft.
Add pork and soy sauce, saute until you see some liquid from the pork.
Add water and let it boil for about 15 minutes.
Add the vinegar (do not mix - let it boil for 10 min).
Let simmer until pork is fork tender.
Drain cooked pork and set aside the adobo sauce.
Place pork pieces in a pyrex dish.
Broil in the oven until the outside of the pork is brown. It is very important to always check on the pork since it will brown quickly.
Add the sauce back into the pork.
Serve over steamed rice.

SUBSCRIBE BY EMAIL HERE

Read full post >>

Roast Pork with Tomato-Mushroom Sauce

15 June 2007


This is a Roast Pork dish that is usually served by our catering business in Pasig. It's simple to make yet elegant enough to serve in parties. The taste is not exotic for non-Filipinos and Americans who have tasted this dish liked it.

You have to start with a good cut of lean Pork Loin, it has to be large enough so it won't disintegrate when you cut it after it had been tenderized. We don't have a special name for this dish. We call this dish 'roast pork'. Big thanks to Mommy for teaching me how to make this dish.

Ingredients:
1 large slab of lean Pork Loin
salt and pepper
4 tbsp cooking oil
1/2 can of small tomato paste
5 cups of chicken stock
1 stick of butter
1 small onion, minced
2 tbsp flour
1 cup broth from the cooked pork loin
1 small can of Cream of Mushroom (use regular not low fat)
1 cup grated cheese (any kind)

Wash and dry the pork loin. Season with salt and pepper. Heat cooking oil in a large pot, brown all sides of the pork loin. Add the tomato paste and scrape the browned bits off the bottom of the pan. Add the chicken stock and stir until the tomato paste is dissolved. Cook until the pork loin is tender, stirring the pot once in a while and adding chicken stock if the liquid becomes too low. Set aside 1 cup of the broth to be used in the next step.

Heat the oven to 350 deg F.

In a smaller pot, in medium heat, add butter. When butter is melted, saute the onions until it's cooked but not browned. Add the flour and cook for a minute or two. Then add the broth (that was set aside from the pork loin) a little at a time to prevent lumps. Wait for it to boil. When it's boiling, add the Cream of Mushroom and stir thoroughly.

Take the roast pork loin and cut it into 1/4 inch slices. Set aside. In a pyrex dish, pour 1 cup of the sauce on the bottom. Arrange the roast pork loin slices in the pyrex dish. Pour more sauce on top of the pork loin. Sprinkle the grated cheese on top of the pork loin. Bake in the oven for about 10-15 minutes, just enough for the pork to be reheated through and the cheese to melt. Serve with rice.


SUBSCRIBE BY EMAIL HERE

Read full post >>

Empanadas

06 June 2007

Empanada
I had a craving for Empanadas the other day and no, I'm not pregnant. LOL My best friend's mom makes the best empanadas, I was talking to my best friend on the phone and in our conversation she mentioned that she's learning how to make it. After that phone call, I can't get the thought of empanadas out of my mind. I know, bad for my waistline. hehehe

Anyways, off I went to the grocery and bought the ingredients. I have to admit that I cheated on the pastry part, I didn't make it from scratch. Hey, I'm a mom to a 6yo and a 17-month old! I don't have much time to slave in the kitchen. LOL I used the ready-made pie pastry, the roll-up kind. I just cut it in rounds and filled it with the sauteed filling. Then just before baking, I brush the pastry with a mixture of egg and a tablespoon of milk to get that yellowish color on top.
Here is the Empanada recipe I used:


Empanadas

3 cups of ground meat
1/2 small onion, minced
1 carrot, minced
1 potato, minced
1 cup raisins (you can adjust this to your taste)
salt and pepper
1 pkg of double pastry crust
1 egg beaten with 1 tbsp of milk

Preheat the oven to 400degrees. Heat a tablespoon of oil. Fry the potatoes until soft, set aside. Saute the onions until it's wilted but not brown. Add the carrots and ground meat. Cook until the meat turns brown. Add the potatoes and raisins. Season with salt and pepper. Set aside to cool down.

Roll out the pastry crust and cut into circles. Fill each rounds with about 2 tablespoons of the cooked meat mixture, do not overfill since this will cause the empanadas to crack. Crimp the edges together to form a tight seal. Brush the empanadas with the egg and milk mixture. Bake in the oven for 30 minutes or until golden brown.

It's a simple recipe, you can tweak it anyway you want. Add whatever vegetables you have at the moment, any ground meat, season it and wrap it in any kind of pastry and voila! You've got a delicious empanada. Enjoy!


SUBSCRIBE BY EMAIL HERE

Read full post >>